If you can use Linux in your IT environment, e.g. on an edge device, then the OPC Router offers you the option of running the functionality in a Docker container. By containerising with Docker, you consume significantly fewer resources than with a virtual machine (VM) or a conventional server. We explain here how you can set up Docker manually or automatically.
If you are using the OPC Router up to version 4.28, this guide will show you how to set up Docker manually or automatically. For the OPC Router from version 5, you can set it up via the Docker Hub or Portainer. We provide you with the instructions for this in our article “How to use the OPC Router with Portainer on an edge computer”.
Contents
Do you have basic questions about Docker or Docker installation on Windows? Here you will find a simple explanation with an industrial focus on the open source tool Docker and an installation guide for Windows.
1. Manual Docker set up
If you want to set up a new service and do this yourself, click on “Set up Docker manually”.
The setup takes place in 3 steps, which are explained below.
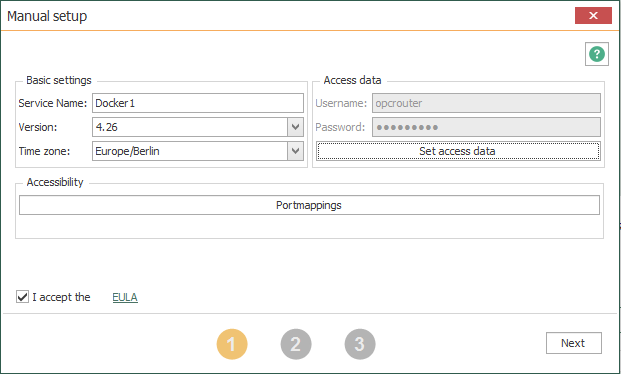
| Service name | Enter the name of the service here, which is displayed in the overview in the router. |
| Version | Select the version you would like to use in the service here. |
| Time zone | Select the appropriate time zone. |
| Set Access data |
Set the user data for access to the OPC Router Service here. These are set via the Windows security. The user is then stored in the remote administration as well as in the database. in the database. |
| EULA | Accept the End User Licence Agreement (EULA) to continue. |
Portmappings:
Enter here the ports that the OPC Router can use for functions in order to send data via them. For functions of the OPC Router you will find suggestions for corresponding functions under ‘Frequent use cases’.
| Exposed Port | Port which must be addressed on the remote server for the respective function. |
| Internal Port | Port that must be addressed on the Docker for the respective function. |
| UDP | Specify whether UDP or TCP is to be used. Note: If the field has a filled Vierec, it has not yet received a value assignment and is accordingly NULL. |
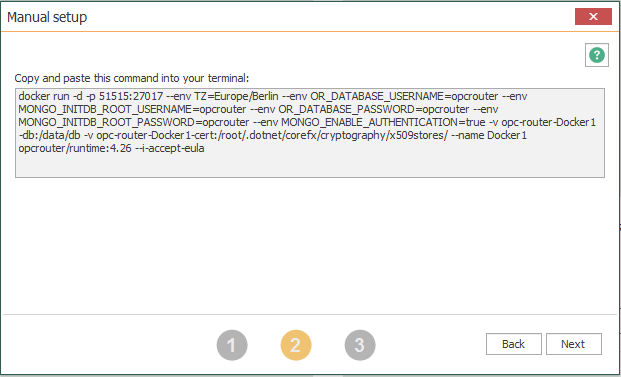
After the setup, the command command is displayed. Copy this command into the terminal on the PC on which you have installed Docker. If you have not installed the corresponding version locally, it will be downloaded.
In the last step, an overview of the respective settings is displayed. Here you can enter the IP address of the respective server on which the service is running.
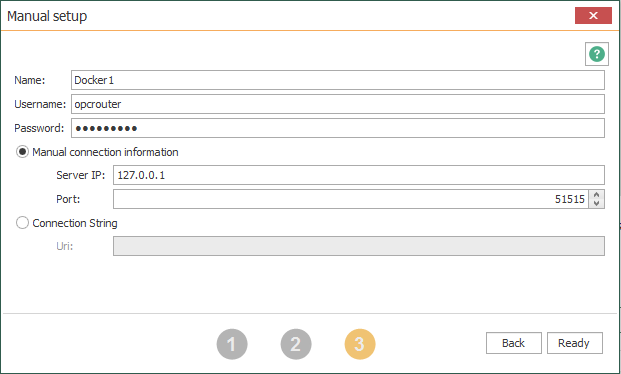
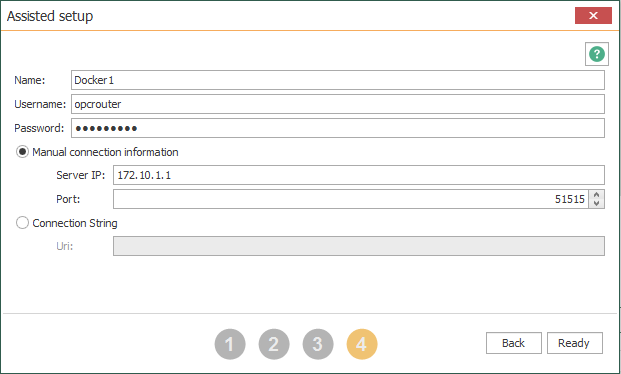
| Name | Name of the service in the service overview. |
| Username | Name of the user to be able to connect to the service. |
| Password | Password to connect to the service. |
| Manual Connection information |
Select this option if you want to connect to the service via IP address and port. Server IP: IP address of the corresponding server. Port: Port of the server. |
| Connection String | Select this option if you want to connect to the service via the Connection String. Uri: Uri string for the connection to the server. |
Example-Uri: mongodb://[IP]:[Port]/?readPreference=primary&appname=OPCRouter4Tests&ssl=false
2. Automatic Docker set up
Attention: This function is only for Linux users. You need an SSH server.
If you want to set up the service automatically, click on “Autmatic Docker set up”.
The 4 steps for setting up are explained below.
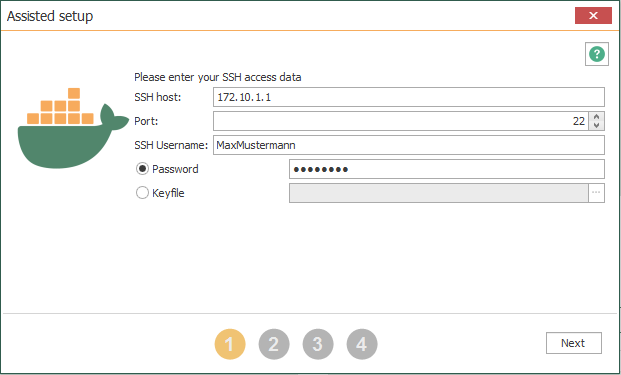
| Host | Enter the IP address or DNS name of the host on which the SSH server is running. |
| Port | Specify the SSH port of the host. |
| Username | Enter the name of the user who is logged in to the SSH server on the host. |
| Password | Enter the user’s password. |
| Keyfile | Select the text file here that contains the private key with which you can connect to the Docker via SSH. |
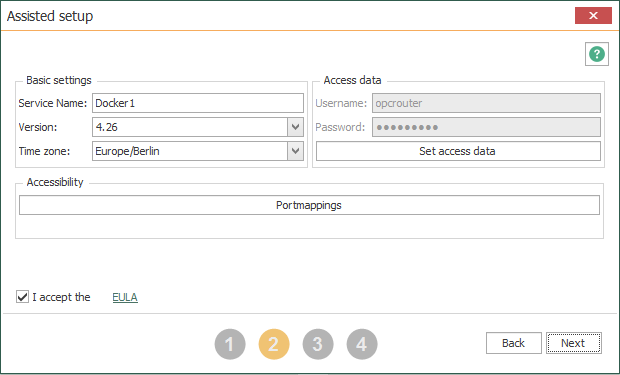
| Service name | Enter the name of the service here, which is displayed in the overview in the router. |
| Version | Select the version you want to use in the service here. Note: The central management is available from version 4.26. |
| Time zone | Select the appropriate time zone. |
| Set access data | Set the user data for access here. These are set via the Windows security. The user is then stored both in the remote administration and in the database. |
| Availability | Set the ports for access here. |
| Eula | Accept the End User Licence Agreement (EULA) to continue. |
Portmappings:
Enter here the ports that the OPC Router can use for functions in order to send data via them. For functions of the OPC Router you will find suggestions for corresponding functions under ‘Frequent use cases’.
| Exposed Port | Port which must be addressed on the remote server for the respective function. |
| Internal Port | Port that must be addressed on the Docker for the respective function. |
| UDP | Specify whether UDP or TCP is to be used. Note: If the field has a filled square, it has not yet received a value assignment and is accordingly NULL. |
If you do not yet have Docker on your system, this step will install it. Afterwards the version of the OPC Router will be installed on Docker. Click on “Next” if all steps are successful. The following steps are followed for installation and execution:
- A connection to the host is established via SSH.
- Then it is checked whether a connection to the Docker Hub can be established.
- Here it is checked whether a Docker installation is available. If not, Docker is installed.
- In this step, the image of the OPC Router is downloaded.
- Finally, Docker run is executed, which starts Docker with the OPC Router service.
Finally you will be shown an overview of all the necessary information. Click on “Done” to complete the
complete the setup.
3. Integrate an existing OPC Router service
If you already have an OPC Router service, you can connect to it. Click on the OPC Router icon and then on ‘Include existing service’.
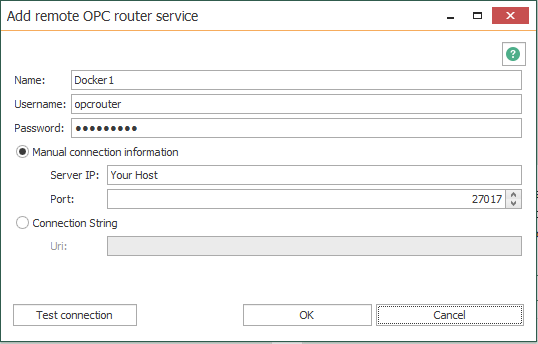
Enter the required data:
| Name | Name of the service in the overview. |
| Username | Enter the name of the corresponding user here to be able to connect to the service. |
| Password | Enter the appropriate password here to connect to the service. |
| Manual connection information |
Select this option if you want to connect to the service via IP address and port. Server IP: IP address of the server on which the service is running. Port: Port of the server. |
| Connection String | Select this option if you want to connect to the service via the Connection String. Uri: Uri string for the connection to the server |
Example-Uri: mongodb://[IP]:[Port]/?readPreference=primary&appname=OPCRouter4Tests&ssl=false
With “Test connection” you can check whether you can successfully connect to the service.
In this video you will be shown the first basics to start using the OPC Router.
Test the OPC Router in the Docker Container now!
Get the link to the latest OPC Router and don’t miss any of the product news.
